How to enable NIC Teaming in windows 10 Using PowerShell
Nic teaming or Link aggregation are various ways to combine multiple network connections to gain more speed, or it can be used for network redundancy.
In previous versions of Windows 10 Pro (before release 1809), I used to use New-NetLbfoTeam PowerShell cmdlet, and it works fine, but after the 1809 release, it stops working.
After hours of research on the internet, I find out that LBFO is no more supported on Windows 10 anymore an only works for Server Operating Systems. I will mention the LBFO cmdlet as well, so in case if you are working on windows servers, you can configure NIC Teaming.
Let's configure the NIC Teaming:
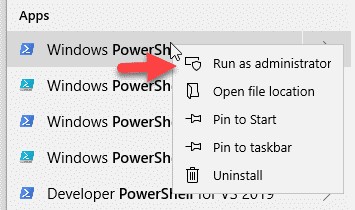
First, open up Windows PowerShell as an administrator.
Next, type the Get-NetAdapter cmdlet in the PowerShell to see the list of Network Adapters available on your computer. I am going to use two Realtek Network Adapter attached to my computer you choose what is convenient for you and write them down for the next command.
Get-NetAdapter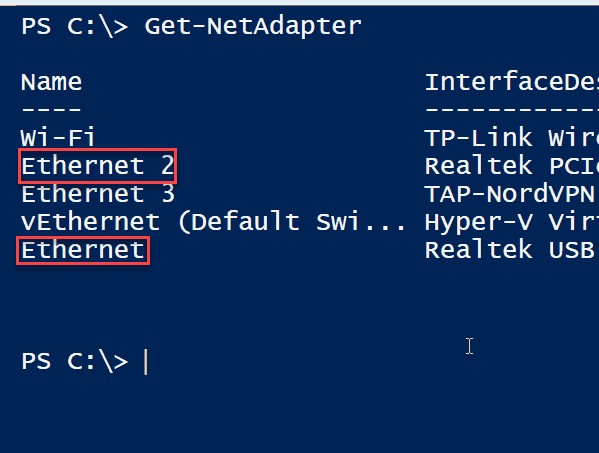
Then type the New-NetSwitchTeam command in the Powershell, and for the Name parameter value type any name you like for me, I’m using 2Gpbs as the name. TeamMembers parameter value will need the name of the network adapters, which are going to be part of NIC teaming for me Ethernet and Ethernet 2.
New-NetSwitchTeam -Name "2Gpbs" -TeamMembers "Ethernet","Ethernet 2"
After running the PowerShell command, if you did not receive any error, it’s mean you were successful. If you receive any error, make sure you type the command correctly or recheck your network adapter names.
Now run Get-NetSwitchTeam command to make sure your team is configured.
Get-NetSwitchTeam
As you can see the Nic Teaming is configured successfully on Windows 10 Pro. If you want to know more about this cmdlet, please visit New-NetSwitchTeam. If you face any issue leave a comment, and I will reply as soon as possible.
Before we end this topic if you want to know more about the NetLbfoTeam command visit New-NetLbfoTeam.
Now it only works for Server Operating systems.
New-NetLbfoTeam -Name "Team1" -TeamMembers "NIC1","NIC2"For those who are interested in learning how to enable NIC Teaming in Windows 10, you can refer to our previous article: Enable NIC Teaming in Windows 11 Using PowerShell: Step-by-Step Tutorial
You might also be interested.






Facing Teaming issue in windows 10
I’ve just tested this on build 2004. It doesn’t work.
As soon as it teamed up, internet went dead. I went to see what was happening, no packets being sent. But I remembered setting wired connections in the times of yore, so I went to properties, set up a local ip, a subnet mask, ip as the gateway and also I set google DNS, and still it didn’t work. Then I ran the network troubleshooter, which found out DHCP is not enabled, and it did. It worked!
However, I’ve tested the speed with a tester, and it showed low numbers. Then I went to download an Nvidia driver with Internet Download Manager which usually is very good, and well… it showed the speed of only one dongle. I have the onboard wifi and other four dongles connecting to the network of the hotel where I live in as staff member. So basically, perhaps it isn’t far from working, but something certainly hinders it. That means I;ll stay with my payed VPN solution, which comes with teaming…
Bogdan, when testing speed try to use multiple connection i would suggest to test speed download a file in your local network or from internet with some download manager because if you are using single connection it will go through single network interface and you will not be able to get max speed.
Aug 2022…
Still works on Windows 11 Same commands!
I just performed this in Windows 11 and it seems to have worked. No errors, and 2Gpbs Microsoft Network Adapter Multiplexor Driver appeared and is registering 2.0 Gpbs for Speed (I also enabled Bonding/ Link aggregation in my Asus router). Internet seems to be functioning fine. Only thing I’ve noticed in Network & Internet Settings under Ethernet is the toggles to set Private or Public are gone for both hardware network adapters; however, in my Avast Firewall I see My Current Network is still listed as Trusted network (as it was set before).
i tried using ethernet realtek and wifi , able to team it but not able to grab the IP. it should the 169.xx.xx.xx.
how to resolve this issue?
This worked! I upgraded a windows 7 machine to windows 10 and the Intel Gigabit ET Dual Port Server Adapter we used could not be teamed in Windows 10 (with Pro-Set / ANS). But the new-NetSwitchTeam cmdlet worked!
Windows 10 Version 1809.
Thanks for documenting this!
You are always welcome!
Remember i am not making any profit from this website so please always comment if you like my work it makes a motivated to keep the website up and running. Thanks
I am trying this configuration on a server connected to a layer 2 switch. And I would like to know which are the teaming mode (switch independent or dependent), load balancing mode and if LACP is enable or not?
Then in the switch side, which are settings to be to adapt the NIC teaming configuration on the server?
Sir
Will you please tell me how to remove Nic Teaming
Hi,
You should check the reply of @Knowitall007.
Thanks
this is the ONLY command which worked – two realtek cards 1Gbps and 100Mbps teamed successfully – the IP address of the Netswitchteam is the same as that of the first team member.
to answer the last comment
PS help Remove-Netswitchteam
NAME
Remove-NetSwitchTeam
SYNTAX
Remove-NetSwitchTeam [-Name] [-CimSession ] [-ThrottleLimit ] [-AsJob] [-PassThru]
[-WhatIf] [-Confirm] []
Remove-NetSwitchTeam -InputObject [-CimSession ] [-ThrottleLimit
] [-AsJob] [-PassThru] [-WhatIf] [-Confirm] []
e.g.
PS C:\>Remove-NetSwitchTeam -Name “SwitchTeam01”
This command deletes the switch team named SwitchTeam01
Thanks for helping others, this is how we should spread the knowledge.
The 2 file you need is:
system32\drivers\MsLbfoProvider.sys
system32\drivers\en-US\MsLbfoProvider.sys.mui
copy the 2 file from windows server and place them into windows 10 same place where you find them in windows server
then open powershell run:
New-NetSwitchTeam -Name “Team Name” -TeamMembers “NIC”,”NIC 2″
I can tell you that you can get it to work, but you need to do some work around and get drivers from windows server to reenable it on windows 10. As of right now I have it running on my windows 10 version 20H2.
Hi I tried using the guide to re-enable lbfo I found on code insecurity but cannot get the service to install any advice would be greatly appreciated
Works fine on Windows education 10.0.18363 not build 18363, but bandwidth is not as many as the added bandwidth of additional cards summed up. For 2 Cards about 140% only instead of 100% with one adapter.
Nice while it lasted. Teaming is broken in 2004 / 19041.329
Yah that’s the only way to enjoy nic teaming for now.
How do you enable LACP mode via this configuration?
You need server OS for this task.
I tried this and it was fun, but I would like to know how to remove the new link on powershell.
Hi,
Which link you are talking about?
Hi there how do you remove the network team