[Fix] The system administrator has set policies to prevent this installation in Windows 10
Table of Contents
If you try to install or update existing software on your computer and come across an error message, “The system administrator has set policies to prevent this installation“ it feels awful. This error message could occur for many reasons, and I will show you various ways to solve this issue.
Solution 1: Fix The system administrator has set policies to prevent this installation By Running The Program As Administrator
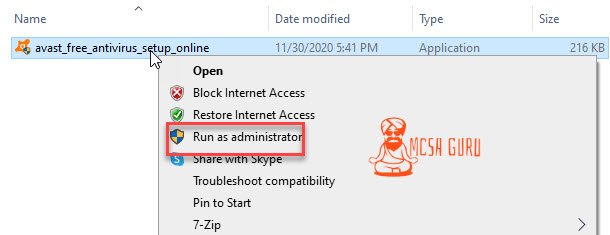
It is a very straight forward and simple solution, and most of the time, it works. Right-click on the program you want to install or upgrade and click on the option “Run as administrator,” as sown in the screenshot below. Out of a hundred sixty percent of the time, this little trick will fix your issue.
Solution 2: Fix The system administrator has set policies to prevent this installation by Modify System Registry
Modify the Windows registry is always very risky, and you should always take a backup of your registry before doing any registry modification. Follow the below steps for backing up your windows registry and afterward fixing the error.
Step 1: How To Backup Windows 10 Registry
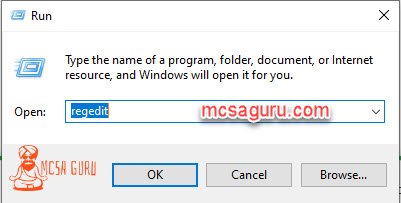
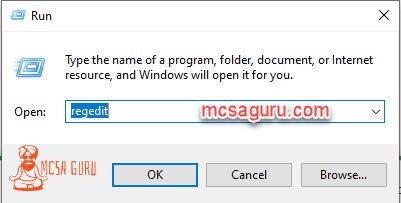
Hold Windows and R keys combination on your computer keyboard to open up the Run Dialog box. Once the Run Dialog box is open, type Regedit in it and press the Enter key to open the Windows Registry Editor as shown in the screenshot below.

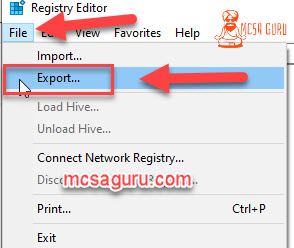
Once the Registry Editor is open click on the File menu and then click on Export as shown in the screenshot below.
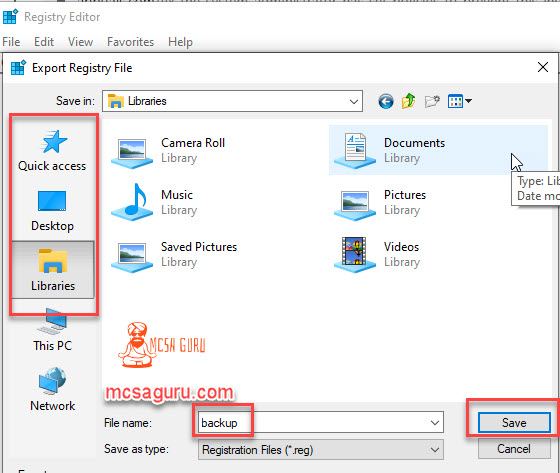
After that, choose the backup location for your registry backup file, give your registry backup file a name, and tap on the Save button to save the Registry Backup as shown in the image below.
Step 2: Modify DisableMSI Value In Windows 10 Registry
Once the Windows Registry backup is done and your Windows Registry Editor is still open, navigate to the following location HKEY_LOCAL_MACHINE\Software\Policies\Microsoft\Windows\Installer afterword right click on the right pane and Click New and after that, click on DWORD (32-bit) Value as shown below
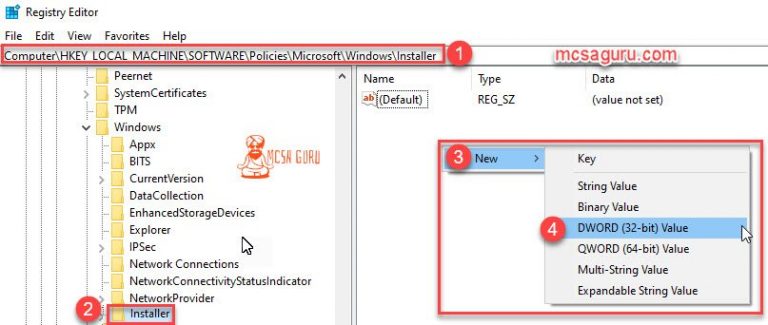
After creating the New Value, give it the name DisableMSI and double click on it to open and modify its value.

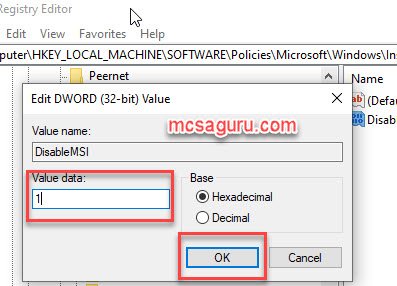
Modify the “Value data:” value from 0 to 1 and click OK to save the value.
Step 3: Delete The Product Entry From Registry
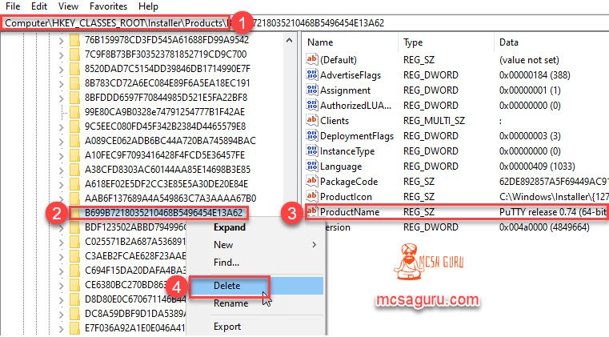
Next, move to the following location HKEY_CLASSES_ROOT\Installer\Products\ and look for the Product Name that gives your trouble. Once you find the product right-click on its key, which should look like a folder icon, and tap on delete to delete it from the registry
Solution 3: Fix The system administrator has set policies to prevent this installation by Disabling UAC
Following the solution mentioned below could put your computer at higher risk but works most of the time. In this method, you have to disable UAC “User Account Control,” which could lead to security flow and compromise your computer security so try it at your own risk.
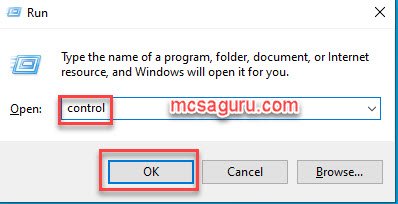
Step 1: Hold Windows and R keys combination on your computer keyboard to open up the Run Dialog box and, once the Run dialog box is open, type Control in it and push the Enter button to open up the Windows 10 control panel.

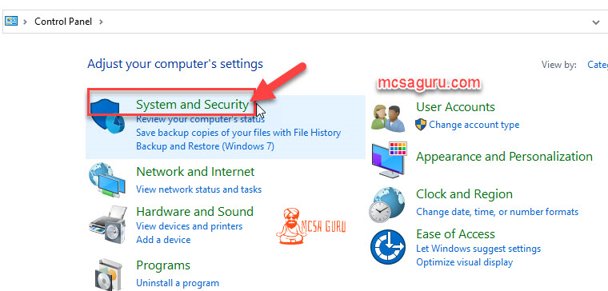
Step 2: Once the Windows 10 control panel is open, click on the System and Security.
Step 3: After that, click on Change User Account Control settings.

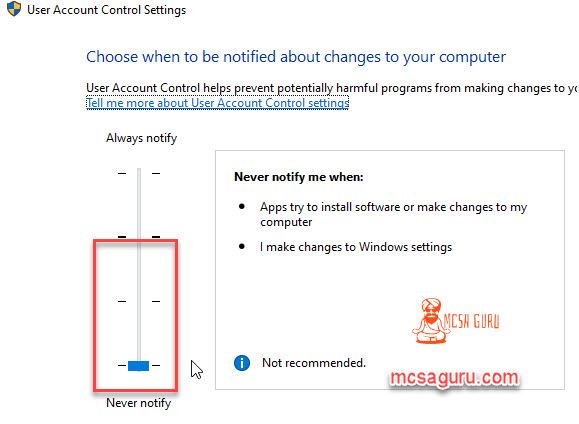
Step 4: Next, move the slider to the bottom to disable the UAC altogether, and after that, close the control panel.
Step 5: Once the UAC is no more active, try to install or upgrade the software again, and it should work, but if you are still facing issues, move to the next solution.
Solution 4: Fix The system administrator has set policies to prevent this installation by Enabling Administrator Account
In some cases, the issue “The system administrator has set policies to prevent this installation“ can be fixed by just enabling the hidden Administrator account and installing the software through that account. You might think that your account already has Admin rights then why will you need to enable the hidden Admin account? Some software must need an administrator account, or they think you are not the real admin. Let’s enable the hidden Administrator account by following the few steps mentioned below.
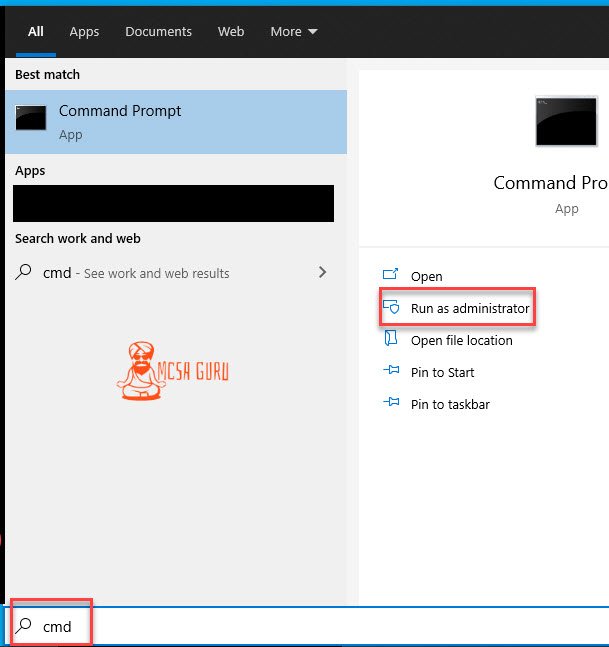
Step 1: Hold Windows and S keys on the keyboard to open the search windows in Windows 10. Once the search window is open, type CMD and click on Run As Administrator, as shown below.

Step 2: Once the Elevated Command Prompt is open, type or paste the following text “net user administrator /active:yes“ in it as shown in the screenshot below and hit Enter on your keyboard.
dism /Online /Enable-Feature /FeatureName:Microsoft-Hyper-V /All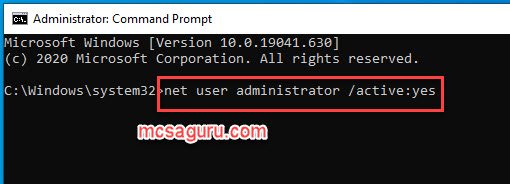
Step 3: Log out from your current logged-in account and log in with the Administrator account you enable above.
Step 4: After your successful login to your Administrator account, try to install or upgrade the software again and see if everything is OK. If you still face any issues, move to Solution number 5 mentioned below.
Solution 5: Fix The system administrator has set policies to prevent this installation by Modify Local Group Policy
Step 1: First, we need to Open up the Run dialog box by holding the Windows and S key combination on your computer keyboard. Once the Run dialog box is open, type “Gpedit.msc“ in it and hit Enter to open up the Group Policy Editor as shown in the screenshot below.

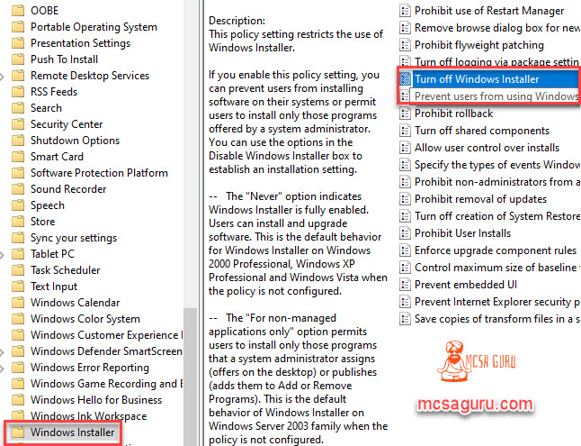
Step 2: Once the Group Policy Editor is open, move to this location Computer Configuration >> Windows Components >> Windows Installer. After that, in the right-side pane, look for the item “Turn off Windows Installer” and double press or “Double Click” on it to open it for modifications, as shown in the image below.
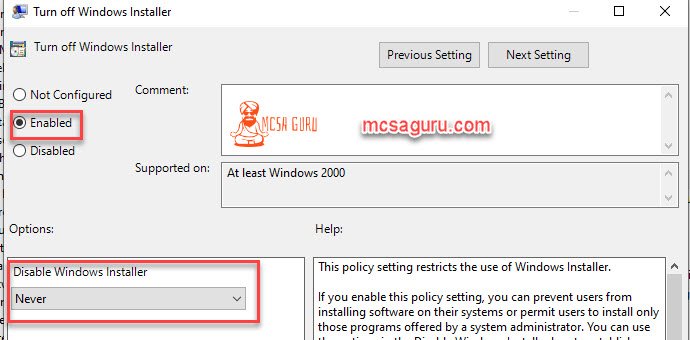
Step 3: Next, Enable this policy, and Disable the Windows Installer option, set it to Never. After that, press the OK button and close the Group Policy Editor, as shown below.
